ProcessSVCEmails and ProcessSingleSVCEmail
Contents
Description
This example shows how GreenVulcano® ESB receipts and processes emails. The workflow consists in two services: ProcessSVCEmails which receives the messages and for each one calls service ProcessSingleSVCEmail that processes it.
ProcessSVCEmails service executes the following operations:
- Checks if there are new service messages
- For each one invokes a processing service
ProcessSingleSVCEmails service executes the following operations:
- Receives data from an email
- Reads the subject and verifies if it is well formatted
- If subject is well formatted invokes the respective service for the request. If don't, sends a preconfigured email.
The request service can be:
- A PDF report
- An Excel report
- A BIRT report
containing data about persons and credit cards.
VulCon Configuration
The preferred mode for creating a Service (at least its skeleton) is through the Service Wizard. Before using it you must first configure the VCL adapters and plugins needed. To do that, go to the VulCon® Adapter view.
GVAdapters Configuration
When emails will be read by the ProcessSingleSVCEmail, the GVBuffer of output will contain a XML with the available data. To read these data you will need a CollectionDataProvider.
To insert a new CollectionDataProvider execute the following steps:
- From the VulCon Core view, expand the element GVDataProviderManager
- Right click the element DataProviders -> Insert After (Insert before)-> CollectionDataProvider
- Click the element just created and set the following parameters as:
- name="CREDIT::SVCEmailListDataProvider"
- source-selector="object"
- Field:
- direction="INOUT"
- key="buffer"
- Expression:
- type="xpath"
- Expression: /MailMessages/Message
When a service requires the generation of a BIRT report, it is necessary to configure the GVDataHandlerConfiguration and GVBIRTReportConfiguration Adapters.
GVDataHandlerConfiguration
Inside of element GVDataHandlerConfiguration visualized from the VulCon® Core view, insert a new DBOBuilder and set its attributes as:
- jdbc-connection-name="ds.gv_test"
- name="ListPersons"
Insert into ListPersons a new item DBOSelect with the property:
- name="ListPersons"
and containing an element statement with:
- id="1"
- type="select"
select ' ', 'NULL' from dual union all
select p.NAME, p.NAME from PERSON p
order by 1
GVBIRTReportConfiguration
Inside of elements GVBIRTReportConfiguration / ReportGroups, create a new ReportGroup (by right clicking element ReportGroups -> Insert After -> ReportGroup). Name it TestGRP.
Inside of TestGRP, insert a new Report. Set its attributes as:
- config: "CreditCards.rptdesign"
- name: "Credit Cards"
Inside of Report Credit Cards insert an element Parameters containing the item Parameter setted as follow:
- control-type: "SELECT"
- label: "Nome"
- name: "NAME"
Inside of NAME put an element DHSource with the attributes:
- service: "ListPersons"
- sort: "true"
- use-string-map: "true"
Now you might define a new Group, System and Channel, if you do not want to use those already present, and then start the Wizard.
GVCore Configurations
When the request concerns the generation of a PDF Report, you also need a FOP transformation.
GreenVulcano® ESB gives the function XSLFOPTransformation for configure it.
In this example, we use the file SearchPerson2FO.xsl and save it into $GV_HOME/gvdte/datasource/xsl/DataHandler/CREDIT folder.
From the VulCon core view, insert a new XSLFOPTransformation:
- Expand the element GVDataTransformation
- Right click the element Transformation -> Insert After -> XSLFOPTransformation
- Click the new XSLFOPTransformation element and set its attributes as follow:
- DataSourceSet="Default"
- XSLMapName="DataHandler/CREDIT/SearchPerson2FO.xsl"
- name="UserDataAsPDF"
Defining System, Channel and Operations
To define a System, go to VulCon core view and, into Systems element, insert the System CREDIT if it is not already present. From there create the Channel CHANNEL_CREDIT_MAIL in which the following operations will be configured:
| Attribute/Sub-element | Value |
|---|---|
| pop-call | name="ReceiveSVCEmail" delete-messages="true" expunge="true" jndi-name="gvesb.mailServer" |
| smtp-call | name="SendEmailSVCResponse" jndi-name="gvesb.mailServer" mail-message:
|
| smtp-call | name="SendEmailNoSVC" jndi-name="gvesb.mailServer" mail-message:
|
| excel-call | name="listPerson" GVExcelReport:
select p.NAME as Name, p.BIRTHDATE as BirthDate, c.NAME as City
from PERSON p, CITY c
where p.ID_CITY = c.ID
decode{{@{{NAME}}::NULL::::and p.NAME='@{{NAME}}'}}
order by c.NAME, p.NAME
select p.NAME as Name, cc.CNUMBER as CardNumber, cc.CREDIT as Credit,
decode(cc.ENABLED, 'Y', 'Yes', 'No') as Active
from PERSON p, CREDIT_CARD cc
where p.ID = cc.ID_OWNER
decode{{@{{NAME}}::NULL::::and p.NAME='@{{NAME}}'}}
order by p.NAME
|
| birt-report-call | groupName="TestGRP" name="CreditCards" reportName="Credit Cards" reportType="excel" |
| dh-call | name="UserDataAsPDF" DBOBuilder:
select p.NAME, p.BIRTHDATE, c.NAME, cc.CNUMBER, cc.CREDIT, cc.ENABLED
from PERSON p, CITY c, CREDIT_CARD cc
where p.ID_CITY = c.ID
and p.ID = cc.ID_OWNER
decode{{@{{NAME}}::NULL::::and p.NAME like '%@{{NAME}}'}}
order by c.NAME, p.NAME
|
GreenVulcano® ESB includes the HSQLDB support database, where the schema GV_TEST is already configured.
Flow implementation
For creating a new service using the Wizard execute the following steps:
- From the Core View of VulCon. Right click the element Services -> Wizard New Service
- A new window will be open where you can set the name of the Service you want to create, in this case we name it ProcessSCVEmails, and as Group, we use CREDIT_GRP. You can also select the scenario, for this example it will be synchronous-synchronous. Click next.
- Set System as CREDIT, Channel as CHANNEL_CREDIT_MAIL and select the Operation ReceiveSVCEmails. Then finish.
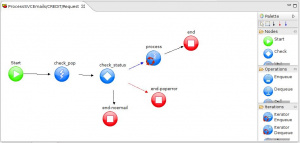
As you can see from the core view, inside the Services element, a new Service named ProcessSCVEmails has been created. The editor will be opened automatically, showing a workflow that must be modified successively as seen in the picture.
First of all, change the Operation name to Request. This is done by clicking the element Operation and setting the attribute name present in the Property view.
Insert a Condition which will test if there are new emails to be processed. This is done from the VulCon Core view inserting into Flow a new element Conditions (right clicking the element Flow). Inside of it insert a GVBufferCondition and set its attributes and subelements as follow:
- Condition: EmailPresent
- GVBufferCondition/Property:
- name: POP_MESSAGE_COUNT
- operator: greater
- value: 0
- value-type: integer
Expand the Palette if it is not already visible from the Editor View. This can be done by clicking into a little arrow head present into the Editor right top corner. The steps to modify the workflow are:
- Click the GVOperationNode "request" and set its attributes as follow:
- dump-in-out="false"
- id="check_pop"
- id-system="CREDIT"
- input="input"
- next-node-id="check_status"
- operation-name="ReceiveSVCEmail"
- output="emails"
- Insert a GVIteratorOperationNode ( drag and drop an Iterator Call node from the palette into the Editor). Click this new element and set its attributes as follow:
- collection-dp="CREDIT::SVCEmailListDataProvider"
- id="process"
- input="emails"
- next-node-id="end"
- output="processed"
- From the VulCon Core view, insert an element CoreCall inside of the GVIteratorOperationNode already created. This is done expanding the GVIteratorOperationNode element, right clicking the element proxy-call created automatically -> Change to -> CoreCall. Set its attributes as:
- change-log-context="true"
- dynamic="false"
- id-service="ProcessSingleSVCEmail"
- id-system="CREDIT"
- operation="Request"
- ref-dp="stringSerializeNodeDataProvider"
- Insert a GVEndNode (drag and drop an EndNode into the editor) and set its attributes as:
- end-business-process="yes"
- id="end"
- output="processed"
- Click on the return_status End Node and change its attributes as:
- end-business-process="yes"
- id="end-noemail"
- output="emails"
- GVEndNode/ChangeGVBuffer:
- clear-data="true"
- Click on the return_error End Node and change its attributes as:
- end-business-process="yes"
- id="end-poperror"
- output="emails"
- GVEndNode/ChangeGVBuffer:
- clear-data="true"
- Create the Connections
- From the Palette, select a Routing Connection (blue arrow) and create a connection between check_status and process. A new windows will be open for selecting the Condition. Select EmailPresent and click OK.
- Select a Default Connection (black arrow) and create a connection between process and end.
- Save the editor clicking on the apposite Eclipse icon and close it.
Repeat these steps for the ProcessSingleSVCEmail, beginning from the Wizard to create this new Service with the parameters:
- Service name: ProcessSingleSVCEmail
- Group: CREDIT_GRP
- Scenario: synchronous-synchronous
- System: CREDIT
- Channel: CHANNEL_CREDIT_MAIL
- Operation: SendEmailNoSVC
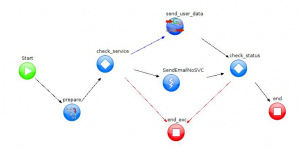
Service ProcessSingleSCVEmail will be created, containing a RequestReply Operation. The editor will be opened automatically, showing a workflow that must be modified successively as seen in the picture.
The first step to be follow is to create three new operations, one for each possible report type:
- Operation with attributes forward-name="LIST_BIRT" name="Forward" operation-activation="on" out-check-type="sys-svc-id"
- Operation with attributes forward-name="LIST_EXCEL" name="Forward" operation-activation="on" out-check-type="sys-svc-id"
- Operation with attributes forward-name="LIST_PDF" name="Forward" operation-activation="on" out-check-type="sys-svc-id"
For creating a new Operation you can use the Wizard, setting the same Service name, or directly from the VulCon® Core view right clicking the element Service -> Insert After (or Insert Before) -> Operation. In both case you will set its parameters as described before.
These operations will extract data from the DB, save it into a file, and will send and email with this file as attachment. Each operation will have a Participant with id-channel="CHANNEL_CREDIT_MAIL" and id-system="CREDIT", and its first node will be extract_data.
The following table shows how configure it:
| Node/Subelement | LIST_BIRT | LIST_EXCEL | LIST_PDF |
|---|---|---|---|
| GVOperationNode |
|
|
|
| GVOperationNode/InputServices/ognl-script-service |
| ||
| GVOperationNode/InputServices/ognl-script-service/ognl-script-call |
| ||
| ChangeGVBufferNode |
|
|
|
| ChangeGVBufferNode/ChangeGVBuffer |
|
|
|
| ChangeGVBufferNode/ChangeGVBuffer/PropertyDef |
|
|
|
| GVOperationNode |
|
|
|
| GVEndNode |
|
|
|
| GVEndNode/ChangeGVBuffer |
|
|
|
Now turn to the RequestReply Operation, created with the Wizard configuration of Service ProcessSingleSVCEmails:
- Change its attributes as:
- name="Request" operation-activation="on" out-check-type="none"
- Insert a Condition which will control the request service type
- right click Flow element -> Insert before -> Conditions
- right click Conditions element -> Insert after -> JavaScriptCondition
- click JavaScriptCondition element and set the parameters condition as "CheckServiceName" and scope-name as "gvesb"
- insert a Script element with the attribute script as
- var services = {'LIST_EXCEL':'1', 'LIST_PDF':'1', 'LIST_BIRT':'1'};
- var data = environment.get(dataName);
- var svc = data.getProperty('SVC');
- ('1' == services[svc]);
- Insert the nodes and set their attributes as described by the following table:
| Node/Subelement | Atributes |
|---|---|
| ChangeGVBufferNode |
|
| ChangeGVBufferNode/ChangeGVBuffer |
|
| ChangeGVBufferNode/ChangeGVBuffer/Script |
|
| GVNodeCheck |
|
| GVNodeCheck/GVRouting |
|
| GVCoreCallNode |
|
| GVOperationNode |
|
| GVNodeCheck |
|
| GVEndNode |
|
| GVEndNode/ChangeGVBuffer |
|
| GVEndNode |
|
| GVEndNode/ChangeGVBuffer |
|
GV Console Configuration
It is time to deploy and test your new Service.
Let's send a service email. The first step is to configure a new email account with the properties:
Server SMTP/POP3
- SMTP : localhost:3025
- POP3: localhost:3110
- Server mailbox: gv1@gv.com (gv1/gv1)
- Client mailbox: gv2@gv.com (gv2/gv2)
gv3@gv.com (gv3/gv3)
Send an email to Server (gv1@gv.com) with the subject SVC=LIST_BIRT or SVC=LIST_EXCEL or SVC=LIST_PDF, depending on the service you want to request, that is, the generation of a BIRT, EXCEL or PDF report. You might also generate a report for a specific person. This is done adding into the email subject a "!" and the Username after the request service. For example: SVC=LIST_PDF!NAME=UserName. In case of BIRT report, you can also select the type (EXCEL or PDF). For example SVC=LIST_BIRT!TYPE=EXCEL!NAME=Username. The default BIRT report type is PDF.
To deploy the new Service follow this steps:
- Start GreenVulcano® ESB
- Access to the GV Console.
- In the Deploy New Service section click Browse and select the .zip file where you saved the VulCon configuration.
- Click Submit.
The section Deploy Services will be open. In this section you can select the services you want to deploy.
- Clicking on service ProcessSVCEmails a new view will be shown containing the files GVCore.xml present in local and on server side.
- Click Deploy. Now you can save the document and write some notes about it.
- Save the Document. By saving you will return to the Deploy Service section.
- Repeat steps 1 to 3 for service ProcessSingleSVCEmail.
Now pass to the GV Console section Utility.
- Click on Reload configuration
- Select GVCore.xml and GVAdapters.xml and then Reload. A new windows will be open to confirm the operation
- Click OK.
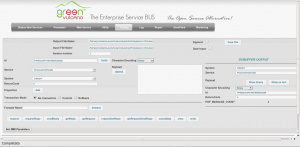
Go to the GV Console® section Testing. In this section you can finally test your new services:
- Into the Service voice select ProcessSVCEmails
- Into the System voice select CREDIT (optional)
- Click Request
The Testing View will be expanded and it is also possible to view the GVBuffer Output panel. There is present the property POP_MESSAGES_COUNT setted to 1, representing the number of emails received.
You will receive an email containing attached a file with the request report. In case of error you will receive an email containing into the message body the available request services. You can control errors and exceptions from the log files present in the directory $GV_HOME/log.


