Difference between revisions of "GVExample CCardQuery"
(→Flow implementation) |
(→{{VULCON}} Configuration) |
||
| Line 18: | Line 18: | ||
===Defining Systems, Channels and Operations=== | ===Defining Systems, Channels and Operations=== | ||
| − | + | In order to define a System, go to {{VULCON}} core view and insert the System CREDIT. Inside of it create the Channel CHANNEL_CREDIT_WS in order to create an "internal" [[Participant]]. We also create the System CREDIT_EXTERNAL with the Channel CHANNEL_CREDIT_EXT corresponding to an "external" [[Participant]]. | |
Note that the easiest way to configure a [[Web Services|Web service]] with {{L_VULCON}} is using the Wizard. We start from a [http://en.wikipedia.org/wiki/Web_service Web Service] WSDL, that describes a withdrawal operation on a credit card. | Note that the easiest way to configure a [[Web Services|Web service]] with {{L_VULCON}} is using the Wizard. We start from a [http://en.wikipedia.org/wiki/Web_service Web Service] WSDL, that describes a withdrawal operation on a credit card. | ||
Revision as of 22:04, 16 February 2012
Contents
Description
This service has the scope of showing how GreenVulcano® ESB uses DataHandler for quering a DB and implements a Web Services.
CCardQuery Service executes the following operations:
- Receives a request Web Service from client, with a credit card number to be controlled.
- If this card is locally managed, reads the data using DataHandler.
- If this card is managed by an external system, forwards a Web Service request to that system.
- Returns the response to the client
VulCon Configuration
To configure CCardQuery service follow these steps:
- Define Systems, Channels and Operations
- Define the Services
- Implement the flows.
Defining Systems, Channels and Operations
In order to define a System, go to VulCon core view and insert the System CREDIT. Inside of it create the Channel CHANNEL_CREDIT_WS in order to create an "internal" Participant. We also create the System CREDIT_EXTERNAL with the Channel CHANNEL_CREDIT_EXT corresponding to an "external" Participant.
Note that the easiest way to configure a Web service with VulCon® is using the Wizard. We start from a Web Service WSDL, that describes a withdrawal operation on a credit card.
From the Core view of VulCon®, right clicking the Services element, launch the Wizard Call Web Service and, after selecting the WSDL file -in this example we use ExternalCreditService.wsdl present in folder ${{gv.app.home}}/xmlconfig/wsdl-, choose the parameters to create the GreenVulcano® ESB service.
A two new Services, Pay and Query, and two ws-call operations, pay and query will be created into the System CREDIT, channel CREDIT_EXTERNAL. We changed those names to CCardPay and CCardQuery for the services, PayExternal and QueryExternal for the ws-call operations respectively. Now you can modify your workflow.
From the VulCon® Core view, element System "CREDIT" -> Channel "CHANNEL_CREDIT_WS", insert a dh-call operation and set its attributes and subelements as follow:
| Attribute | Value |
|---|---|
| name | DataHandler |
| DBOBuilder | name="CREDIT::CCardQuery" jdbc-connection-name="ds.test_gv" DHVariables:
|
| DBOBuilder/ DBOSelect | name="CCardQuery" transformation="CCardQuery" type="dbo" statement id="1" type="select" select p.NAME, cc.CNUMBER, cc.CREDIT, cc.ENABLED
from PERSON p, CREDIT_CARD cc
where p.ID = cc.ID_OWNER
and cc.CNUMBER = @{{CNUMBER}}
|
The operation defined in the DataHandler makes use of the data-transformation module for the data transformations that allow to have data in XML format. So, you need to define the following parameters into the GVDataTransformation section:
| Element | Attributes |
|---|---|
| DataSourceSet/LocalFSDataSource | formatHandled="xsl" name="XSLDataSource" repositoryHome="${{gv.app.home}}/gvdte/datasource/xsl" type="datasource" |
| XSLTransformation | name="CCardQuery" DataSourceSet="Default" XSLMapName="DataHandler/CREDIT/CCardQuery.xsl" type="transformation" |
| XSLTransformation | name="QueryExternalInput" DataSourceSet="Default" XSLMapName=" CREDIT_EXTERNAL/QueryExternalInput.xsl" type="transformation" |
| XSLTransformation | name="QueryExternalOutput" DataSourceSet="Default" XSLMapName=" CREDIT_EXTERNAL/QueryExternalOutput.xsl" type="transformation" |
Now control that the ws-call element attributes and subelements defined into System CREDIT_EXTERNAL -> Channel CHANNEL_CREDIT_EXT will be setted as:
| Attribute | Value |
|---|---|
| Name | QueryExternal |
| AxisWebServiceInvoker | operation="Query" ref-dp="EXTERNAL::QueryWSDataProvider" returnType="body-element" type="invoker" WSDLInfo:
|
Flow implementation
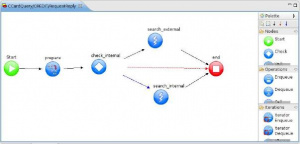
To define the CCardQuery service Flow design it as shown in the picture:
The service receives a Web Service request from a client with a credit card number. If this card is managed locally, reads its data using Data Handler, otherwise forwards the request to an external system using Web Service.
The following table shows the parameters to be defined for each Flow node:
| Attribute | Value |
|---|---|
| first-node | Prepare |
| Conditions/GVBufferCondition | condition="isInternalCCard" Property:
|
| ChangeGVBufferNode | dump-in-out="true" id="prepare" input="input" next-node-id="check_internal" clear-data="false" PropertyDef:
PropertyDef:
|
| GVRouting | condition="isInternalCCard" next-node-id="search_internal" |
| GVOperationNode | dump-in-out="false" id="search_internal" id-system="CREDIT" input="input" next-node-id="end" op-type="call" operation-name="DataHandler" output="output" |
| GVOperationNode | dump-in-out="false" id="search_external" id-system="CREDIT_EXTERNAL" input="input" next-node-id="end" op-type="call" operation-name="QueryExternal" InputServices:
OutputServices:
|
| GVEndNode | end-business-process="yes" id="end" op-type="end" output="output" |
GV Console Configuration
It is time to deploy and test your new Service. To do that follows these steps:
Suppose you have saved the VulCon Configuration file as "${{gv.app.home}}/TEST/REPG1.zip". To deploy the new Service follow this steps:
- Start GreenVulcano® ESB
- Access to the GV Console.
- In the Deploy New Service section click Sfoglia... (Browse) and select the file where you have saved the VulCon configuration.
- `Click Submit.
The section Deploy Services will be open. In this section you can select the services you want to deploy.
- Clicking on service CCardQuery a new view will be open containing the files GVCore.xml present in local and in server.
- Click Deploy. Now you can save the document and write some notes about it.
- Save the Document. Saving you return to the Deploy Service section.
Now pass to the GV Console section Utility.
- Click on Reload configuration
- Select GVCore.xml and GVAdapters.xml and then Reload. A new windows will be open to confirm the operation
- Click OK.
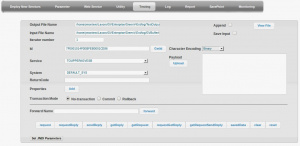
Go to the GV Console section Testing. In this section you can finally test your new services:
- Into the Service voice select CCardQuery
- Into the System voice select CREDIT_EXTERNAL
- Select the Payload on input containing the credit card number you want to test
- Click RequestReply
The Testing View will be expanded and it is also possible to view the GVBuffer Output panel where there are present some properties, among these the REC_READ property setted to 1, representing the number of record read from DB.
The file TestOutput.txt will be generated in the directory ${{gv.app.home}}/log as previously setted (see Testing, data input area) containing information about owner, credit and state of the credit card number "1234123415555666" as passed in input.
<pre>
----------- TEST N. 0 2012.02.15 at 11:46:26 -----------
Standard Field:
	system   = CREDIT_EXTERNAL
	service  = CCardQuery
	id       = 7F0001014F3B87B900021429
	retCode  = 0
GVBuffer: class org.apache.xerces.dom.DocumentImpl
<?xml version="1.0" encoding="UTF-8"?>
  <QueryResponse xmlns="http://www.credit.com/services">
     <name>MARIO BIANCHI</name>
     <cnumber>1234123415555666</cnumber>
     <credit>300.00000</credit>
     <active>true</active>
  </QueryResponse>
Properties:
	REC_DISCARD = 0
	IS_INTERNAL = true
	REC_TOTAL = 0
	REC_UPDATE = 0
	REC_INSERT = 0
	REC_READ = 1
	CNUMBER = 1234123415555666
	REC_DISCARD_CAUSE =
</pre>


