Difference between revisions of "TestFileAttachment"
G.iannello (talk | contribs) m (→Description) |
(→{{GVCONSOLE}} Configuration) |
||
| (11 intermediate revisions by 2 users not shown) | |||
| Line 12: | Line 12: | ||
=={{VULCON}} Configuration== | =={{VULCON}} Configuration== | ||
| − | + | The preferred mode for creating a Service (at least its skeleton) is through the Service Wizard. Before using it you must first configure the VCL plugins neeeded. So let's define a new Group, System and Channel, if you do not want to use those already present, and then start the Wizard. | |
| − | |||
| − | |||
| − | |||
===Defining System, Channel and Operations=== | ===Defining System, Channel and Operations=== | ||
| − | To define a System, go to {{VULCON}} core view and, into Systems element, insert the System GVESB if it is not already present. | + | To define a System, go to {{VULCON}} core view and, into Systems element, insert the System GVESB if it is not already present. |
| + | From there create the Channel TEST_CHANNEL_FILE in which the following operations will be configured: | ||
* [[filemanager-call]] | * [[filemanager-call]] | ||
| Line 61: | Line 59: | ||
===Flow implementation=== | ===Flow implementation=== | ||
| − | [[File: | + | [[File:GVExamples_TestFileAttachmentWizard.jpg|thumb|New {{GVESB}} Service Wizard]]Now we are able to use the Wizard. |
| + | # From the Core View of {{VULCON}}. Right click the element Services -> Wizard New Service | ||
| + | # A new window will be open where you can set the name of the Service you want to create. Set id-service as TestFileAttachment, and Group as TEST_GROUP. The scenario will be [[Paradigms_of_communication#synchronous-synchronous|synchronous-synchronous]]. Click next. | ||
| + | # Set System as GVESB and Channel as TEST_CHANNEL_FILE. Then choose the first Operation to be executed, in this case ''ScanAttachments''. Then finish. | ||
| − | The | + | [[File:GVExamplesTestFileAttachmentFlow.jpg|thumb|TestFileAttachment flow]] As you can see from the core view, inside the Services element, a new Service named TestFileAttachment has been created. The editor will be opened automatically, showing the nodes involved in our [[Flow]]. To implement the TestFileAttachment service [[Flow]] design it as shown in the picture: |
| − | |||
The following table shows the nodes and attributes to be defined: | The following table shows the nodes and attributes to be defined: | ||
| Line 107: | Line 107: | ||
It is time to deploy and test your new Service. To do that execute the following steps: | It is time to deploy and test your new Service. To do that execute the following steps: | ||
| − | [[File:GVCONSOLEDeploy.jpg|thumb|Deploy new Service]]Suppose you have saved the {{VULCON}} Configuration file as <nowiki>"$ | + | [[File:GVCONSOLEDeploy.jpg|thumb|Deploy new Service]]Suppose you have saved the {{VULCON}} Configuration file as <nowiki>"$GV_HOME/TEST/REPG1.zip"</nowiki>. To deploy the new Service follow this steps: |
# [[Starting|Start {{GVESB}}]] | # [[Starting|Start {{GVESB}}]] | ||
# [[GV_Console#Access|Access to the {{GVCONSOLE}}]]. | # [[GV_Console#Access|Access to the {{GVCONSOLE}}]]. | ||
| − | # In the Deploy New Service section click | + | # In the Deploy New Service section click Browse and select the file where you saved the {{VULCON}} configuration. |
| − | # | + | # Click Submit. |
The section [[Deploy_Service|Deploy Services]] will be open. In this section you can select the services you want to deploy. | The section [[Deploy_Service|Deploy Services]] will be open. In this section you can select the services you want to deploy. | ||
| − | # Clicking on service TestFileAttachment a new view will be | + | # Clicking on service TestFileAttachment a new view will be showed containing the files GVCore.xml present in local and on server side. |
# Click Deploy. Now you can save the document and write some notes about it. | # Click Deploy. Now you can save the document and write some notes about it. | ||
# Save the Document. By saving you will return to the [[Deploy Service]] section. | # Save the Document. By saving you will return to the [[Deploy Service]] section. | ||
| Line 123: | Line 123: | ||
# Click OK. | # Click OK. | ||
| − | [[File: | + | [[File:GVExamplesTestFileAttachmentOutput.jpg|thumb|Testing TestFileAttachment]]Go to the {{GVCONSOLE}} section [[Testing]]. In this section you can finally test your new services: |
# Into the Service voice select TestFileAttachment | # Into the Service voice select TestFileAttachment | ||
# Into the System voice select GVESB | # Into the System voice select GVESB | ||
# Click RequestReply | # Click RequestReply | ||
| − | The Testing View will be expanded and it is also possible to view the GVBuffer Output panel where there are present some properties, among these the GVFM_FOUND_FILES_NUM property | + | The Testing View will be expanded and it is also possible to view the GVBuffer Output panel where there are present some properties, among these the GVFM_FOUND_FILES_NUM property set to 3, representing the number of files found. |
| − | The file TestOutput.txt will be generated in the directory | + | The file TestOutput.txt will be generated in the directory $GV_HOME/log as previously set (see [[Testing]], [[Testing#Data_input|Data input]] area) containing information about the files found and the email already sent. |
<syntaxhighlight lang="XML"> | <syntaxhighlight lang="XML"> | ||
<pre> | <pre> | ||
| Line 143: | Line 143: | ||
Properties: | Properties: | ||
messageID = <9388830.11329325352084.JavaMail.gv1@gv.com> | messageID = <9388830.11329325352084.JavaMail.gv1@gv.com> | ||
| − | GVFM_FOUND_FILES_LIST = | + | GVFM_FOUND_FILES_LIST = $GV_HOME/TEST/TESTFS/TestAttach/input/001.txt; |
| − | + | $GV_HOME/TEST/TESTFS/TestAttach/input/002.txt; | |
| − | + | $GV_HOME/TEST/TESTFS/TestAttach/input/003.txt | |
GVFM_FOUND_FILES_NUM = 3 | GVFM_FOUND_FILES_NUM = 3 | ||
| − | GV_SMTP_ATTACHMENTS = | + | GV_SMTP_ATTACHMENTS = $GV_HOME/TEST/TESTFS/TestAttach/input/001.txt; |
| − | + | $GV_HOME/TEST/TESTFS/TestAttach/input/002.txt; | |
| − | + | $GV_HOME/TEST/TESTFS/TestAttach/input/003.txt | |
</pre> | </pre> | ||
</syntaxhighlight> | </syntaxhighlight> | ||
| Line 163: | Line 163: | ||
| − | You can also check that the files | + | You can also check that the files were moved into the directory $GV_HOME/TEST/TESTFS/TestAttach/sent. |
Latest revision as of 11:54, 20 February 2012
Contents
Description
This example shows how to use GreenVulcano® ESB to send an email containing attachments.
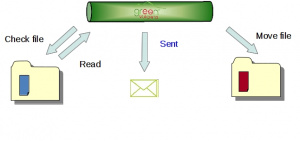
TestFileAttachment service executes the following operations:
- Reads a file from an input directory (TestAttach/input)
- Sends an email with this file as attachment
- Moves the sent file to another directory (TestAttach/sent)
VulCon Configuration
The preferred mode for creating a Service (at least its skeleton) is through the Service Wizard. Before using it you must first configure the VCL plugins neeeded. So let's define a new Group, System and Channel, if you do not want to use those already present, and then start the Wizard.
Defining System, Channel and Operations
To define a System, go to VulCon core view and, into Systems element, insert the System GVESB if it is not already present. From there create the Channel TEST_CHANNEL_FILE in which the following operations will be configured:
| Attribute/Subelement | Value |
|---|---|
| name | ScanAttachments
FileCommands:
|
| Attribute/Subelement | Value |
|---|---|
| name | MoveAttachments
FileCommands:
|
| Attribute | Value |
|---|---|
| jndi-name | gvesb.mailServer |
| name | SendEmail |
| mail-message | content-type="text-html" high-priority="true" sender-display-name="GV ESB" subject="Test send attachments"
|
Flow implementation
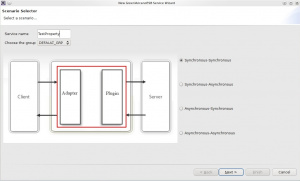
Now we are able to use the Wizard.
- From the Core View of VulCon. Right click the element Services -> Wizard New Service
- A new window will be open where you can set the name of the Service you want to create. Set id-service as TestFileAttachment, and Group as TEST_GROUP. The scenario will be synchronous-synchronous. Click next.
- Set System as GVESB and Channel as TEST_CHANNEL_FILE. Then choose the first Operation to be executed, in this case ScanAttachments. Then finish.
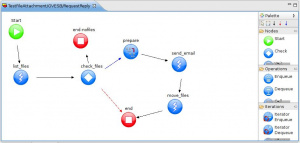
As you can see from the core view, inside the Services element, a new Service named TestFileAttachment has been created. The editor will be opened automatically, showing the nodes involved in our Flow. To implement the TestFileAttachment service Flow design it as shown in the picture:
The following table shows the nodes and attributes to be defined:
| Attribute/Subelement | Value |
|---|---|
| first-node | Prepare |
| Conditions/GVBufferCondition | condition="FilesFound" type="condition"
Property:
|
| GVOperationNode | dump-in-out="false" id="list_files" id-system="GVESB" input="input" next-node-id="check_files" op-type="call" operation-name="ScanAttachments" output="files" |
| GVNodeCheck | default-id="end-nofiles" id="check_files" input="files" on-exception-id="end" GVRouting:
|
| ChangeGVBufferNode | dump-in-out="true" id="prepare" input="files" next-node-id="send_email" output="files" ChangeGVBuffer: clear-data="false"
|
| GVOperationNode | dump-in-out="false" id="send_email" id-system="GVESB" input="files" next-node-id="move_files" operation-name="SendEmail" output="files" |
| GVOperationNode | dump-in-out="false" id="move_files" id-system="GVESB" input="files" next-node-id="end" operation-name="MoveAttachments" output="files" |
| GVEndNode | end-business-process="yes" id="end-nofiles" output="files" |
| GVEndNode | end-business-process="yes" id="end" output="files" |
Save the editor clicking on the Save icon of Eclipse. Control that there are not errors in the flow and save it in the apposite icon present in the Core View of VulCon®. From the Project view, expand your project, refresh (f5), and right clicking the folder "conf" export your new configuration.
GV Console Configuration
It is time to deploy and test your new Service. To do that execute the following steps:
Suppose you have saved the VulCon Configuration file as "$GV_HOME/TEST/REPG1.zip". To deploy the new Service follow this steps:
- Start GreenVulcano® ESB
- Access to the GV Console.
- In the Deploy New Service section click Browse and select the file where you saved the VulCon configuration.
- Click Submit.
The section Deploy Services will be open. In this section you can select the services you want to deploy.
- Clicking on service TestFileAttachment a new view will be showed containing the files GVCore.xml present in local and on server side.
- Click Deploy. Now you can save the document and write some notes about it.
- Save the Document. By saving you will return to the Deploy Service section.
Now pass to the GV Console section Utility.
- Click on Reload configuration
- Select GVCore.xml and then Reload. A new windows will be open to confirm the operation
- Click OK.
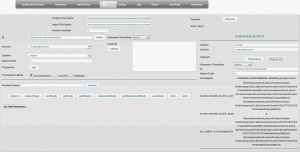
Go to the GV Console section Testing. In this section you can finally test your new services:
- Into the Service voice select TestFileAttachment
- Into the System voice select GVESB
- Click RequestReply
The Testing View will be expanded and it is also possible to view the GVBuffer Output panel where there are present some properties, among these the GVFM_FOUND_FILES_NUM property set to 3, representing the number of files found.
The file TestOutput.txt will be generated in the directory $GV_HOME/log as previously set (see Testing, Data input area) containing information about the files found and the email already sent.
<pre>
----------- TEST N. 0 2012.02.15 at 18:02:32 -----------
Standard Field:
	system   = GVESB
	service  = EmailFileAttachment
	id       = 7F0001014F3BE51400059DBA
	retCode  = 0
GVBuffer: class java.lang.String

Properties:
	messageID = <9388830.11329325352084.JavaMail.gv1@gv.com>
	GVFM_FOUND_FILES_LIST = $GV_HOME/TEST/TESTFS/TestAttach/input/001.txt;
                                $GV_HOME/TEST/TESTFS/TestAttach/input/002.txt;
                                $GV_HOME/TEST/TESTFS/TestAttach/input/003.txt
	GVFM_FOUND_FILES_NUM = 3
	GV_SMTP_ATTACHMENTS = $GV_HOME/TEST/TESTFS/TestAttach/input/001.txt;
                              $GV_HOME/TEST/TESTFS/TestAttach/input/002.txt;
                              $GV_HOME/TEST/TESTFS/TestAttach/input/003.txt
</pre>
Set a new account with the properties:
Server SMTP/POP3
- SMTP : localhost:3025
- POP3: localhost:3110
- Server mailbox: gv1@gv.com (gv1/gv1)
- Client mailbox: gv2@gv.com (gv2/gv2)
gv3@gv.com (gv3/gv3)
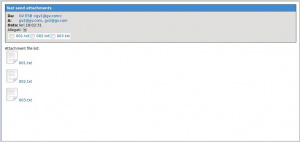
You will receive an email as this shown in the picture.
You can also check that the files were moved into the directory $GV_HOME/TEST/TESTFS/TestAttach/sent.
