Difference between revisions of "Installing Developer Studio"
F.albanese (talk | contribs) |
F.albanese (talk | contribs) |
||
| (5 intermediate revisions by the same user not shown) | |||
| Line 1: | Line 1: | ||
| + | <div class="version_ge3.3"> | ||
| + | |||
| + | |||
==System Requirements== | ==System Requirements== | ||
{{DEVELOPERSTUDIO}}<sup>®</sup> requires one of the following: | {{DEVELOPERSTUDIO}}<sup>®</sup> requires one of the following: | ||
| Line 13: | Line 16: | ||
{{DEVELOPERSTUDIO}}<sup>®</sup> archive package contains all you need to create and configure your integration business workflows via {{L_VULCON}}. | {{DEVELOPERSTUDIO}}<sup>®</sup> archive package contains all you need to create and configure your integration business workflows via {{L_VULCON}}. | ||
| − | It can be downloaded from {{GVESB}} web site [http://www.greenvulcano.com download]. | + | It can be downloaded from {{GVESB}} web site [http://www.greenvulcano.com/en/download.html download]. |
==Unpack And Launch== | ==Unpack And Launch== | ||
* On your drive, navigate to {{DEVELOPERSTUDIO}}<sup>®</sup> .zip file you downloaded. | * On your drive, navigate to {{DEVELOPERSTUDIO}}<sup>®</sup> .zip file you downloaded. | ||
| − | * Unzip it everywhere you want | + | * Unzip it everywhere you want. |
| − | * Enter <code>DeveloperStudio</code> folder | + | * Enter <code>DeveloperStudio</code> folder. |
* Double click {{DEVELOPERSTUDIO}}<sup>®</sup> executable file depending on your operating system: | * Double click {{DEVELOPERSTUDIO}}<sup>®</sup> executable file depending on your operating system: | ||
| − | - <code>DeveloperStudio.exe</code> for Windows Systems | + | - <code>DeveloperStudio.exe</code> for Windows Systems. |
| − | - <code>DeveloperStudio</code> for Linux Systems | + | - <code>DeveloperStudio</code> for Linux Systems. |
| − | *Before opening the GUI, {{DEVELOPERSTUDIO}}<sup>®</sup> displays a pop-up dialogue to allow you to designate the workspace folder in which will be stored all your project-specific files. | + | * Before opening the GUI, {{DEVELOPERSTUDIO}}<sup>®</sup> displays a pop-up dialogue to allow you to designate the workspace folder in which will be stored all your project-specific files. |
| − | [[File:DeveloperStudioWorkspaceLauncher.jpg | + | |
| + | |||
| + | [[File:DeveloperStudioWorkspaceLauncher.jpg|{{DEVELOPERSTUDIO}} workspace launcher|300px]] | ||
| + | |||
| + | |||
| + | * Enter the filepath to the location on your drive in which you want to store your {{DEVELOPERSTUDIO}}<sup>®</sup> projects, then click OK. | ||
| + | * {{DEVELOPERSTUDIO}}<sup>®</sup> opens a Welcome Page to help you get started. | ||
| + | |||
| + | |||
| + | [[File:DeveloperStudioFirstSteps.jpg|{{DEVELOPERSTUDIO}} first steps|400px]] | ||
| + | |||
| + | |||
| + | * Click one of the following links to get starting with {{DEVELOPERSTUDIO}}<sup>®</sup>: | ||
| + | - <code>New {{VULCON}} Project</code> -> {{DEVELOPERSTUDIO}} opens a wizard to lead you create a new project. | ||
| + | - <code>Go to {{VULCON}} Preference Page</code> -> {{DEVELOPERSTUDIO}} opens preferences page in which you can manage settings for {{L_VULCON}} License, {{VULCON}} [[Debugger]] and [[HP Systinet]]. | ||
| + | - <code>Go to {{DEVELOPERSTUDIO}}</code> -> {{DEVELOPERSTUDIO}} closes Welcome Page and opens workbench. | ||
| + | |||
| + | * Click one of the following links to get more informations about {{L_DEVELOPERSTUDIO}} and {{GVESB}}: | ||
| + | - <code>Getting started with {{DEVELOPERSTUDIO}}</code> -> {{DEVELOPERSTUDIO}} opens its wiki page on your default browser. | ||
| + | - <code>Learn more about {{GVESB}}</code> -> {{DEVELOPERSTUDIO}} opens {{GVESB}} wiki home page on your default browser. | ||
| + | - <code>Discover {{GVESB}}</code> -> {{DEVELOPERSTUDIO}} opens {{GVESB}} home page on your default browser. | ||
| + | |||
| + | |||
| + | </div> | ||
| − | + | {{VOTE}} | |
Latest revision as of 12:05, 11 March 2013
System Requirements
Developer Studio® requires one of the following:
Windows32 or 64 bitLinux32 or 64 bit
Java Requirements
Developer Studio® requires Java Development Kits (JDK) installed on your system:
Java JDK SE(v.1.6 or higher) download
Download
Developer Studio® archive package contains all you need to create and configure your integration business workflows via VulCon®.
It can be downloaded from GreenVulcano® ESB web site download.
Unpack And Launch
- On your drive, navigate to Developer Studio® .zip file you downloaded.
- Unzip it everywhere you want.
- Enter
DeveloperStudiofolder. - Double click Developer Studio® executable file depending on your operating system:
-DeveloperStudio.exefor Windows Systems. -DeveloperStudiofor Linux Systems.
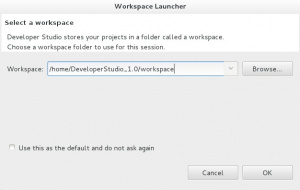
- Before opening the GUI, Developer Studio® displays a pop-up dialogue to allow you to designate the workspace folder in which will be stored all your project-specific files.
- Enter the filepath to the location on your drive in which you want to store your Developer Studio® projects, then click OK.
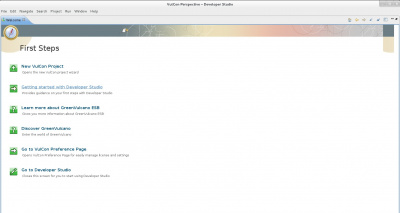
- Developer Studio® opens a Welcome Page to help you get started.
- Click one of the following links to get starting with Developer Studio®:
-New VulCon Project-> Developer Studio opens a wizard to lead you create a new project. -Go to VulCon Preference Page-> Developer Studio opens preferences page in which you can manage settings for VulCon® License, VulCon Debugger and HP Systinet. -Go to Developer Studio-> Developer Studio closes Welcome Page and opens workbench.
- Click one of the following links to get more informations about Developer Studio® and GreenVulcano® ESB:
-Getting started with Developer Studio-> Developer Studio opens its wiki page on your default browser. -Learn more about GreenVulcano® ESB-> Developer Studio opens GreenVulcano® ESB wiki home page on your default browser. -Discover GreenVulcano® ESB-> Developer Studio opens GreenVulcano® ESB home page on your default browser.
{{#w4grb_rate:}} <w4grb_ratinglist latestvotes items="5" nosort/>

