GVExample TOUPPER
The easiest way to create a service with VulCon® is to interact with the Wizard New Service option.
From the core view:
- expand the element GVServices
- right click the element Services
- select from the visualized drop down menu the object Wizard New Service
In addition to the name of the service, the user could select a group (including those already configured) and a paradigm of communication between couples Client-ESB and ESB-Server. In this new service, the client will be the system suggested by the name "GVESB", and the server will be a testing service internal to GreenVulcano® ESB
- choose "DEFAULT_GRP" as a group
- choose "Synchronous-Synchronous" as a scenario
- call the Service "TOUPPER".
Continuing with the Wizard, the user can choose the client system, and the requested operation that will run on the server through the selection of the triple system-Channel-Operation.
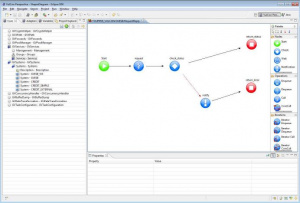
After you click on the button "Finish", a new service named "TOUPPER" will be available. In addition, a diagram is shown with the flow operations (in this case only one: the RequestReply).
The user can also customize the flow created by adding new nodes with the help of the palette tools. For example, let's add a Notification node for notifying an error occurred in the flow (must be inserted after a check node and it is identified by a red arrow).
- pick a notification node present in the palette and drag it into the editor
- give it a name, we use notify
- make the Error connection (red arrow pointing from check_status to end_error nodes), to point to notify node by dragging the arrowhead
- create a Default connection from notify to end_error
- save the editor (Ctrl+s) or directly from the Eclipse Menu.
- control that everything is fine in the Core view. Errors are visualized using the icon 20px for the superelements and a red cross over the icon of the node for which the warning is present (20px in this case)
- moves the cursor over the object with warning. In this case notify. Comments and warnings (reported with a red background) of the DTD elements appear as a tooltip. In this case it reads: "Attribute output in the element GVNotificationNode cannot be empty"
- set in the property panel the attribute output, preferably with the input value of one of the preceding operation nodes in order to avoid and exception spread.
- save the changes into the core view
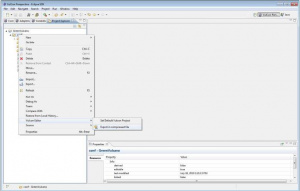
Once the flow is correctly configured, the user can export the configuration and pass it to the GreenVulcano® ESB import tool, in order to add into the ESB the service just created. The Export function is available in the view "Navigator Explorer" (or "Project Explorer" depending on the Eclipse version), expanding the project and clicking the folder "conf" with the left mouse button (before you proceed press F5 to refresh the file list). It will open a drop-down list, which shows the "VulCon Editor "> option "Export in compressed files".
Now you can test your First Vulcon Project using the GV Console®. You can find the "How To" for this example clicking here.

