Difference between revisions of "GVExample TestProperty"
(→{{VULCON}} Configuration) |
(→{{VULCON}} Configuration) |
||
| Line 23: | Line 23: | ||
Now we are able to configure our flow from the Editor View. Expand the [[Palette]] if it is not already visible from the Editor View. This can be done by clicking into a little arrow head present into the Editor right top corner. The steps are: | Now we are able to configure our flow from the Editor View. Expand the [[Palette]] if it is not already visible from the Editor View. This can be done by clicking into a little arrow head present into the Editor right top corner. The steps are: | ||
# Add a [[Main_nodes|ChangeGVBuffer Node]]: | # Add a [[Main_nodes|ChangeGVBuffer Node]]: | ||
| − | ## From the Palette drag and drop into the editor a ChangeGVBuffer Node. [[File: | + | ## From the Palette drag and drop into the editor a ChangeGVBuffer Node. [[File:GVExamples_TestProperty2.jpg|thumb|Adding a ChangeGVBuffer Node]]A new windows will be open where you can set the element id and its input GVBuffer name. In this example we set |
#* id: test_property | #* id: test_property | ||
#* input: data <br/> Then -> Next | #* input: data <br/> Then -> Next | ||
| Line 38: | Line 38: | ||
# Save the Editor in the Eclipse Main Menu. | # Save the Editor in the Eclipse Main Menu. | ||
| − | The flow is already created. We added more properties in order to illustrate some {{GVESB}} [[Placeholders]]. | + | The flow is already created. We added more properties in order to illustrate some {{GVESB}} [[Placeholders]]. You can add more PropertyDef elements by right clicking the ''ChangeGVBuffer'' element present in the ChangeGVBufferNode -> Insert After -> PropertyDef. The defined properties are: |
{|class="gvtable" | {|class="gvtable" | ||
! PropertyDef name !! value | ! PropertyDef name !! value | ||
| Line 61: | Line 61: | ||
|} | |} | ||
| − | Before finishing you must control that the {{ | + | Before finishing you must control that the {{VULCON}} Configuration has not errors. Errors are indicated by a red cross into the element icon. |
# As we can see, it is present an error in the ''end'' node. Clicking this element we realize that is missing the output field. | # As we can see, it is present an error in the ''end'' node. Clicking this element we realize that is missing the output field. | ||
# Set the parameter ''output'' as the ''output'' of the preceding node, that of ''test_property'' node. | # Set the parameter ''output'' as the ''output'' of the preceding node, that of ''test_property'' node. | ||
| Line 68: | Line 68: | ||
# Save your changes using the Save icon present in the [[Core View]]. | # Save your changes using the Save icon present in the [[Core View]]. | ||
| − | [[File: | + | [[File:GVExamples_TestProperty3.jpg|thumb|TestProperty configuration]]Now your Service ''TestProperty'' will be configured as seen in the following picture. |
Revision as of 13:57, 10 February 2012
Description
TestProperty service shows the use of the various metadata. This example is limited to create some properties and set its value with the scope of illustrating how metadata can be used. But shows also how to construct the possible properties that you will need in more complex flows.
For more information about metadata (or placeholders) click here.
VulCon Configuration
The Service TestProperty can be configured using the VulCon Editor View. The following list enumerates the configuration steps.
- By commodity, we will use an existing Group, in this case DEFAULT_GRP group. But is also possible create a new one if your project needed.
- Create a new Service: From the VulCon Core View, right clicking on Services, insert-after -> Service. A new element Service will be created.
- Set the Service parameters in the Properties panel. We setted:
- group-name as DEFAULT-GRP
- id-service as TestProperty
- Insert a new Operation: Right click the new Service element -> Insert after -> Operation. A new element Operation will be created.
- Set the Operation attributes: We setted the attribute name as Request.
- Add a Participant: Right clicking the operation element -> Insert after -> Participant. A new Participant element will be created.
- Set the parameters value for Participant: Click on the new Participant element. From the Properties view set:
- id-System as GVESB
- id-channel as TEST_CHANNEL
- Finally, open the editor: Right click the element Operation -> Open Editor. A new window will be open into the VulCon Editor View with the Start Node.
Now we are able to configure our flow from the Editor View. Expand the Palette if it is not already visible from the Editor View. This can be done by clicking into a little arrow head present into the Editor right top corner. The steps are:
- Add a ChangeGVBuffer Node:
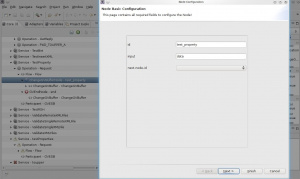
- From the Palette drag and drop into the editor a ChangeGVBuffer Node. A new windows will be open where you can set the element id and its input GVBuffer name. In this example we set
- id: test_property
- input: data
Then -> Next
- Choose the Virtual Layer Operation you need: in this case we add a ChangeGVBuffer. Then -> Next
- You can also set an Operation Level 2: As we want to define some Properties, we select a PropertyDef.
- Set the property name as SQL and the value as sql{{ds.gv_test::select 'OK' from dual}}. Then -> Finish.
- Add an End Node:
- From the Palette drag and drop into the editor a EndNode Node. A new windows will be open where you can set the element id. In this example we set
- id: end.
Then -> Finish
- Create the connections:
- From the Palette click into the Default Connection (black arrow)
- Create a connection between the Star Node and test_property ChangeGVBuffer Node. This is done by clicking first the Start Node and then the test_property node.
- Create another Default Connection between test_property ChangeGVBuffer Node and end node.
- Save the Editor in the Eclipse Main Menu.
The flow is already created. We added more properties in order to illustrate some GreenVulcano® ESB Placeholders. You can add more PropertyDef elements by right clicking the ChangeGVBuffer element present in the ChangeGVBufferNode -> Insert After -> PropertyDef. The defined properties are:
| PropertyDef name | value |
|---|---|
| SQL | sql{{ds.gv_test::select 'OK' from dual}} |
| SQLLIST | [sqllist{{ds.gv_test::select name from city order by 1}}] |
| TIMESTAMP | timestamp{{yyyyMMdd HH:mm:ss}} |
| OGNL | Service: ognl{{#object.getService()}} |
| JAVASCRIPT | System: js{{gvesb::object.getSystem()}} |
| SYSTEM | Server Name: ${{jboss.server.name}} |
| CLASS | %{{fqclass}} |
| DECODE | decode{{ognl{{#object.getProperty('SQL')}}::OK::Sql OK::Sql KO}} |
| MINUTE | Minute decode{{js{{gvesb::timestamp{{mm}} % 2 == 0}}::true::EVEN::ODD}} |
Before finishing you must control that the VulCon Configuration has not errors. Errors are indicated by a red cross into the element icon.
- As we can see, it is present an error in the end node. Clicking this element we realize that is missing the output field.
- Set the parameter output as the output of the preceding node, that of test_property node.
- On clicking test_property element we see that the output has been setted automatically to output_1. You can change this value or set it if is not present. We changed it to output.
- Set the end element attribute output as output too.
- Save your changes using the Save icon present in the Core View.
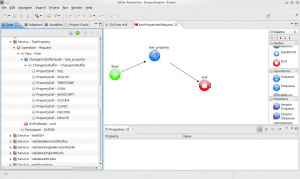
Now your Service TestProperty will be configured as seen in the following picture.

