Difference between revisions of "VulCon"
(→Next steps) |
(→Version 3.6) |
||
| (31 intermediate revisions by 4 users not shown) | |||
| Line 2: | Line 2: | ||
[[File:VulconWorkingArea.jpg|thumb|{{VULCON}} working area]] | [[File:VulconWorkingArea.jpg|thumb|{{VULCON}} working area]] | ||
{{VULCON}} is a graphical console that helps the users to design and configure {{GVESB}} business flows. | {{VULCON}} is a graphical console that helps the users to design and configure {{GVESB}} business flows. | ||
| − | It's an [http://www.eclipse.org/ Eclipse] plug-in. | + | It's an [http://www.eclipse.org/Eclipse] plug-in. |
The actors involved in {{GVESB}} business flows implementation are: | The actors involved in {{GVESB}} business flows implementation are: | ||
| Line 23: | Line 23: | ||
In the plug-in list check if "{{VULCON}} Editor" is present, in this case it has been successfully installed. | In the plug-in list check if "{{VULCON}} Editor" is present, in this case it has been successfully installed. | ||
| + | |||
| + | <div class="version_ge3.3"> | ||
| + | Unlike the previous version, the installation of the {{VULCON}} plugin is changed. To install or update the {{VULCON}} plugin, an Eclipse update site is now available at the following URL: | ||
| + | |||
| + | '''''<nowiki>http://www.greenvulcano.com/download/vulcon/update-site</nowiki>''''' | ||
| + | |||
| + | To install or update the {{VULCON}} plugin, follow the following steps: | ||
| + | # Select Help > Install New Software... | ||
| + | # In the Work with field, type the update site and click Add... | ||
| + | # Enter a name for the update site (e.g. ''{{VULCON}} update site'') and click Ok | ||
| + | # Check the ''GreenVulcano'' checkbox and click Next. Then follow the dialogs to install the provided features. | ||
| + | |||
| + | At installation completion, check if it was successful looking at menu, | ||
| + | <syntaxhighlight lang="XML"> | ||
| + | Windows --> Preferences --> VulCon | ||
| + | </syntaxhighlight> | ||
| + | |||
| + | </div> | ||
In order to see {{VULCON}} license information | In order to see {{VULCON}} license information | ||
| Line 34: | Line 52: | ||
*max {{VULCON}} services | *max {{VULCON}} services | ||
*max {{VULCON}} systems | *max {{VULCON}} systems | ||
| + | |||
| + | <div class="version_ge3.3"> | ||
| + | [[File:licensevulcon.png|thumb|{{VULCON}} License]] | ||
| + | Unlike the previous version, the installation of the {{VULCON}} license can be done using the following form: | ||
| + | <syntaxhighlight lang="XML"> | ||
| + | Windows --> Preferences --> VulCon --> VulCon License --> Install License File. | ||
| + | </syntaxhighlight> | ||
| + | here you can upload the license received by email. | ||
| + | </div> | ||
==Next steps== | ==Next steps== | ||
| − | In order to learn more about {{VULCON}} user interface see [[Example Creating a new VulCon project]] and [[{{VULCON}} perspective]] section. Otherwise, if you already know the user interface, you may want to design and configure your [[{{VULCON}} first flow]]. Once implemented your business flow you may visit the [[{{VULCON}} deploy]], and to test it you must use {{L_GVCONSOLE}} deploy. If you have an existing {{VULCON}} project you can [[import]] it. To manage the life cycle of your application you can use [[HP Systinet]]. | + | In order to learn more about {{VULCON}} user interface see [[Example Creating a new VulCon project]] and [[{{VULCON}} perspective]] section. Otherwise, if you already know the user interface, you may want to design and configure your [[{{VULCON}} first flow]]. Once implemented your business flow you may visit the [[{{VULCON}} deploy]], and to test it you must use {{L_GVCONSOLE}} deploy. If you have an existing {{VULCON}} project you can [[import]] it. To manage the life cycle of your application you can use [[HP Systinet]]. |
| + | <div class="version_ge3.3"> | ||
| + | See the amazing [[Debugger]] available from {{GVESB}} v3.3, the essential tool for your productivity. | ||
| + | Find [[WizardConfiguration|here]] the new {{VULCON}} configuration wizard. | ||
| + | </div> | ||
| + | <div class="version_ge3.6"> | ||
| + | ==Version 3.6== | ||
| + | Version 3.6 has the following new features: | ||
| + | *It is unlicensed | ||
| + | *A project can be saved using only the save button on the Tabs bar | ||
| + | *There are four Tabs: Services, Systems, Adapter and Core | ||
| + | *The Tabs have a text filter useful to show only some for components | ||
| + | *The Debugger can be configured for different versions of GreenVulcano ESB server | ||
| + | *It's possible to debug Forward operations | ||
| + | |||
| + | ==Configuration 3.6== | ||
| + | [[File:configTab.jpeg|thumb|{{VULCON}} working area]] | ||
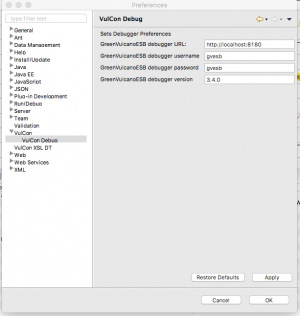
| + | [[File:configDebug.jpeg|thumb|{{VULCON}} working area]] | ||
| + | go to: Windows --> Preferences --> VulCon | ||
| + | |||
| + | you can configure the objects to see in Adapter and Core Tree Tab and Debug parameters | ||
| + | </div> | ||
| + | |||
| + | |||
| + | |||
| + | |||
| + | |||
| + | |||
| + | |||
| + | |||
| + | |||
| + | |||
| + | |||
| + | |||
| + | |||
| + | |||
| + | |||
| + | |||
| + | |||
| + | |||
| + | |||
| + | |||
| + | |||
| + | |||
| + | |||
| + | |||
| + | |||
| + | |||
| + | |||
| + | |||
| + | |||
| + | |||
| + | |||
| + | |||
{{VOTE}} | {{VOTE}} | ||
Latest revision as of 15:10, 4 May 2017
Contents
Introduction
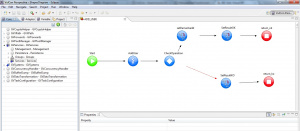
VulCon is a graphical console that helps the users to design and configure GreenVulcano® ESB business flows. It's an [1] plug-in.
The actors involved in GreenVulcano® ESB business flows implementation are:
- Business Analyst: designs the business flow regardless how to interface systems.
- Technical specialist: configures the flow designed by Business Analyst, adding all technical information needed to interface systems.
At the end of design and configuration job, the user is able to generate a zip file containing all necessary GreenVulcano® ESB files, in order to deploy and test the business flows by means of GV Console®.
Requirements
In order to install and run VulCon plug-in, you must accomplish the following requirements:
- Java JDK SE (v.1.6 or higher) download
- Eclipse IDE for Java EE Developers (v.3.5 or higher) download
Installation
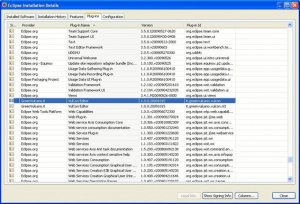
The installation procedure consists in decompressing the vulcon-(Version Number).zip file and then copying the jar file into Eclipse dropins folder. After starting Eclipse, you can check if the plug-in has been installed correctly, following the menu item
Help --> About Eclipse Platform --> Installation Details.
In the plug-in list check if "VulCon Editor" is present, in this case it has been successfully installed.
Unlike the previous version, the installation of the VulCon plugin is changed. To install or update the VulCon plugin, an Eclipse update site is now available at the following URL:
http://www.greenvulcano.com/download/vulcon/update-site
To install or update the VulCon plugin, follow the following steps:
- Select Help > Install New Software...
- In the Work with field, type the update site and click Add...
- Enter a name for the update site (e.g. VulCon update site) and click Ok
- Check the GreenVulcano checkbox and click Next. Then follow the dialogs to install the provided features.
At installation completion, check if it was successful looking at menu,
Windows --> Preferences --> VulCon
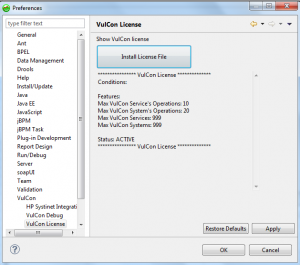
In order to see VulCon license information
Open Windows --> Preferences --> VulCon License.
From this section you can see:
- the product expiration date
- max VulCon service's operation
- max VulCon system's operation
- max VulCon services
- max VulCon systems
Unlike the previous version, the installation of the VulCon license can be done using the following form:
Windows --> Preferences --> VulCon --> VulCon License --> Install License File.
here you can upload the license received by email.
Next steps
In order to learn more about VulCon user interface see Example Creating a new VulCon project and VulCon perspective section. Otherwise, if you already know the user interface, you may want to design and configure your VulCon first flow. Once implemented your business flow you may visit the VulCon deploy, and to test it you must use GV Console® deploy. If you have an existing VulCon project you can import it. To manage the life cycle of your application you can use HP Systinet.
See the amazing Debugger available from GreenVulcano® ESB v3.3, the essential tool for your productivity. Find here the new VulCon configuration wizard.
Version 3.6
Version 3.6 has the following new features:
- It is unlicensed
- A project can be saved using only the save button on the Tabs bar
- There are four Tabs: Services, Systems, Adapter and Core
- The Tabs have a text filter useful to show only some for components
- The Debugger can be configured for different versions of GreenVulcano ESB server
- It's possible to debug Forward operations
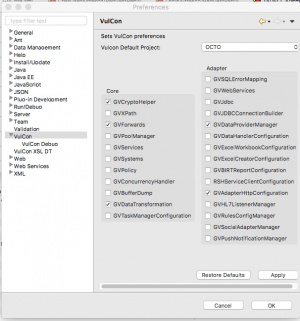
Configuration 3.6
go to: Windows --> Preferences --> VulCon
you can configure the objects to see in Adapter and Core Tree Tab and Debug parameters
{{#w4grb_rate:}}
<w4grb_ratinglist latestvotes items="5" nosort/>
