Difference between revisions of "Example Creating a new VulCon project"
(→New Project {{VULCON}}) |
(→New Project {{VULCON}}) |
||
| Line 1: | Line 1: | ||
==New Project {{VULCON}}== | ==New Project {{VULCON}}== | ||
| − | [[File:FirstVulConProjectCreated.png|thumb|{{VULCON}} Project | + | [[File:FirstVulConProjectCreated.png|thumb|{{VULCON}} Project]] |
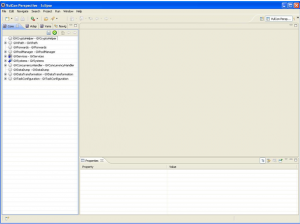
This page will guide the user through the creation of a new {{VULCON}} project and the configuration of the {{GVESB}}, developing the first business flow. Firstly user has to create a new project. As shown below,{{VULCON}} has its own kind of project, and startup files will be generated in order to properly configure VulCon views.After starting Eclipse, following the menu item | This page will guide the user through the creation of a new {{VULCON}} project and the configuration of the {{GVESB}}, developing the first business flow. Firstly user has to create a new project. As shown below,{{VULCON}} has its own kind of project, and startup files will be generated in order to properly configure VulCon views.After starting Eclipse, following the menu item | ||
<syntaxhighlight lang="XML"> | <syntaxhighlight lang="XML"> | ||
File --> New --> Project. | File --> New --> Project. | ||
</syntaxhighlight> | </syntaxhighlight> | ||
| − | The user at this point select the new project {{VULCON}}, and Eclipse will continue through the wizard the wizard to finish creating the project. | + | The user at this point select the new project {{VULCON}}, and Eclipse will continue through the wizard the wizard to finish creating the project. After the procedure you will show the user interface [[{{VULCON}} perspective]] As shown in figure "{{VULCON}}Project". |
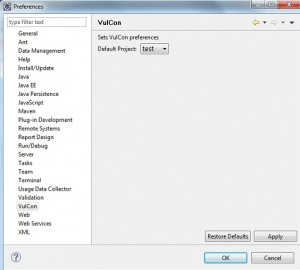
| − | + | If we have many projects in our workspace {{VULCON}} to work on the newly created one, just go to | |
<syntaxhighlight lang="XML"> | <syntaxhighlight lang="XML"> | ||
Windows --> Preferences-->Vulcon. | Windows --> Preferences-->Vulcon. | ||
</syntaxhighlight> | </syntaxhighlight> | ||
| − | + | to set the newly created project, as shown in figure | |
| − | + | [[File:Preferences-vulcon.jpg|center|thumb|Preferences {{VULCON}}]] | |
| − | |||
| − | |||
| − | |||
| − | |||
| − | |||
| − | |||
| − | |||
| − | |||
| − | [[File:Preferences-vulcon.jpg|center|thumb| | ||
| − | |||
Revision as of 14:05, 20 January 2012
New Project VulCon
This page will guide the user through the creation of a new VulCon project and the configuration of the GreenVulcano® ESB, developing the first business flow. Firstly user has to create a new project. As shown below,VulCon has its own kind of project, and startup files will be generated in order to properly configure VulCon views.After starting Eclipse, following the menu item
File --> New --> Project.
The user at this point select the new project VulCon, and Eclipse will continue through the wizard the wizard to finish creating the project. After the procedure you will show the user interface VulCon perspective As shown in figure "VulConProject". If we have many projects in our workspace VulCon to work on the newly created one, just go to
Windows --> Preferences-->Vulcon.
to set the newly created project, as shown in figure

