VulCon
Introduction
GreenVulcano® ESB connects applications and heterogeneous technologies, providing services of orchestration in a consistent way , security, messaging, intelligent routing and data transformation, acting as a backbone through which software services and application components traveling. The key figures that come into play in the configuration of an ESB are the Business Analyst, the person who creates the flow and the Technical Specialist, the person who implements the flow drawn from the Business Analyst. VulCon is designed as a plug-in for Eclipse.
Installation
The installation procedure consists in decompressing the vulcon-(Version Number).zip file and then copying the jar file in the Eclipse dropins folder. After starting eclipse, you can check if the plugin has been installed correctly, following the menu item Help > About Eclipse Platform > Installation Details If present, the installation of the plugin has been successful. The VulCon License View shows your VulCon plugin License, the features enabled and the validity. Exploren menu of Eclipse Windows > Preferences > VulCon > VulCon License
Create New Project
VulCon has its own type of project, in which files are created for the initial operation of the views of the new project in more than one switch to the perspective VulCon where there are three views for configuration. The three views for configuring VulCon are:
| Core: | Represents the core configuration file of GreenVulcano® ESB. |
|---|---|
| Adapters: | Represents the configuration file of the adapters of GreenVulcano® ESB.The adapters view may change depending on the installation or the license of VulCon that you use. |
| Variables: | Represents the file where you define the variables identified in previous views. |
Example Creating a new VulCon project
First flow service
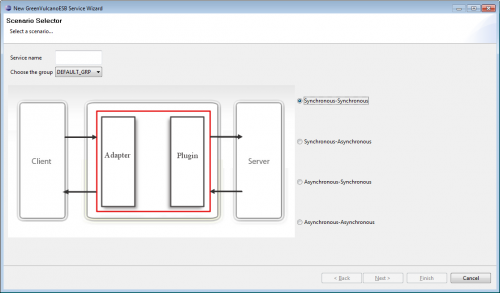
The easiest way to create a VulCon Service is interacting with the “Wizard New Service” option. From the Core view, select the wizard item in the drop down menu shown expanding the GVServices element and clicking on the Services element with the right mouse button. In addition to service name, user may select a group (among those ones already configured) and a communication paradigm between the couples Client-ESB and ESB-Server. In this new service, client will be any system suggested with GreenVulcano® ESB name, and server will be an internal GreenVulcano® ESB test service.
Now let’s choose “DEFAULT_GRP” as group and “Synchronous-Synchronous” as scenario. Service will be called “TOUPPER_VULCON”
Going ahead with the wizard, user may choose client system (see Fig.3), and the request operation to be runned on server, through the selection of System – Channel – Operation triplet.
After clicking on Finish button, a new TOUPPER_VULCON service will be available, as shown on Fig.5. In addition, a shape diagram will be shown up with all the flow operations (just one in this case, request).
User may customize a service flow, adding new operation nodes with the palette tool, as shown in Fig.6. For example, let’s add a Notification node to notify a flow error (after the check node: it’s identified with a red arrow) (See fig.7).
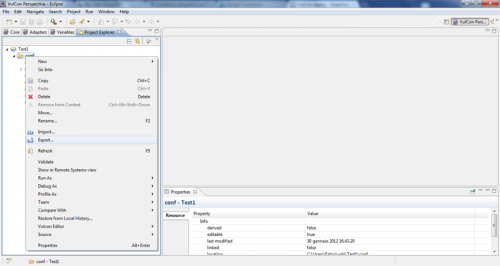
Once a service flow is correctly configured, user may export its configuration and give it to the GreenVulcano® ESB import tool in order to add the service just created. Export function is available in the Navigator Explorer view (or Project Explorer basing on your eclipse version), expanding the project element and clicking on conf folder with left mouse button. A drop-down list will be opened, showing the {VULCON}} Editor > Export in compressed file option. (See Fig.8)

